We have seen in the earlier part of the AI model deployment how to set up the directory as well as the git. In this part we will build the foundation of how we can deploy model locally and in the next article we deploy the model in Heroku and Streamlit, In this section we will focus how to deploy model using Json .
1.Iris Model deployment using JSON.
1.1. Packages
The following packages were used to create the application.
1.1.1. Numpy
1.1 .2. Flask, Request, Jsonfy, render_template from flask
1.1.3. Dataset, Ensemble, Model Selection from sklearn
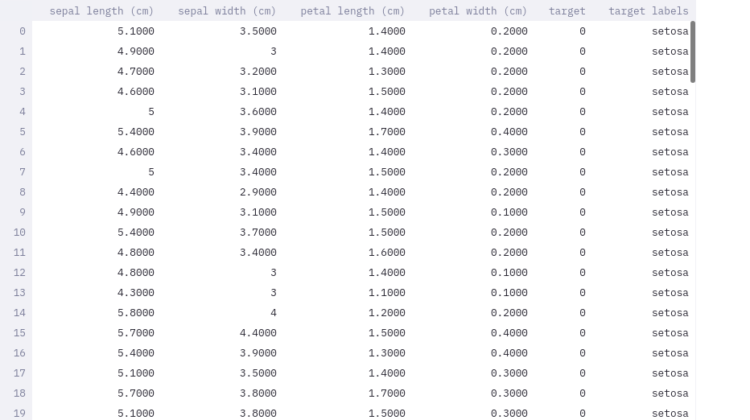
1.2. Dataset
Dataset is used to train the model is of iris dataset composed of 4 predictors and 3 target variable i.e. Classes
Predictors: Sepal Length, Sepal Width, Petal Length, Petal Width
Target : Setosa [0], Versicolor[1], Verginica[0]
Dataset Shape: 150 * 5
1.3. Model
For training the model we followed the following procedure:
Data Split up: 8:2 ie. 80% training set and 20 for the test set
Model: Ensemble- RandomForestClassifier(n_estimators=500)
Saving Model: Saved in the pickle file
Below is the code for the training the model.
import sklearnimport
sklearn.datasetsimport sklearn.ensembleimport sklearn.model_selection
import pickle
import os #load datadata = sklearn.datasets.load_iris() #Split the data into test and traintrain_data, test_data, train_labels, test_labels = sklearn.model_selection.train_test_split(data.data, data.target, train_size=0.80)print(train_data,train_labels) #Train a model using random forestmodel = sklearn.ensemble.RandomForestClassifier(n_estimators=500)model.fit(train_data, train_labels)#test the model
result = model.score(test_data, test_labels)
print(result) #save the model
filename = ‘iris_model.pkl’
pickle.dump(model, open(filename, ‘wb’))
Now, after training the model, we need to create the script which sends the data to the script which is locally hosted in our system. The locally hosted script will classify the data. Below is the code for the script which will send the data.
Script for sending JSON data client script:
#import libraries
import numpy as np
from flask import Flask, request, jsonify, render_template
import requests
import json
import osurl="Url of the locally hosted application"
data = {‘A’: 5, ‘b’: 1, ‘c’: 3, ‘d’: 4}data=json.dumps(data)
send_requests=requests.post(url,data)
print(send_requests)
result=send_requests.json()
#result=json.loads(result)labels=[‘setosa’,‘versicolor’,‘virginica’]
print(labels[result[‘results’][‘results’]])
The above code will convert the data into the JSON format and will send to the classifier/server script.
1.4 Deployment
For deployment the model we will use Server-Client procedure where client script will send the data to the server and the server will classify and send the data back to client scriptThe following code will send the data true and forth for the client script.
Script for Server script:
#!/usr/bin/env python2
# -*- coding: utf-8 -*-
”””Created on Wed Jan 20 21:40:45 2021
@author: ravishekhartiwari@website: https://www.rstiwari.com"""#%%import pandas as pd
from flask import Flask, jsonify, request
import pickle5 as pickle
import json
import numpy as np#%% # load model
pickle_in = open(‘iris_model.pkl’,”rb”)model = pickle.load(pickle_in)
app = Flask(__name__) # routes
@app.route(‘/’, methods=[‘POST’])
def predict():
# get data
data = request.get_json(force=True)
# convert data into dataframe
data.update((x, [y]) for x, y in data.items())
data_df = pd.DataFrame.from_dict(data)
# predictions
result = model.predict(data_df)
# send back to browser
output = {‘results’: int(result[0])}
# return data
return jsonify(results=output) if __name__ == ‘__main__’:
app.run(port = 5000, debug=True)
1.5 Final Ouput
Congratulation, we have created JSON APIfor Iris Server- Client process.
Step 1: Run the server script
Command: python3 server.py
Since it is using JSON format it will show method not found. But you need not to get carried away it is totally fine because we did not create any front end we are just using the API to access the result.
The above application is deployed and it displays the port number which is highlighted i.e. http://127.0.0.1:5000/. Now we need to replace the url in the client script to to run the code. The output is shown below.
The left side is client script where it shows the predicted class i.e. Versicolor with response 200 which means the APIis working fine.
As we say “Car is useless if it doesn’t have a good engine” similarly student is useless without proper guidance and motivation. I will like to thank my Guru as well as my Idol “Dr. P. Supraja”- guided me throughout the journey, from the bottom of my heart. As a Guru, she has lighted the best available path for me, motivated me whenever I encountered failure or roadblock- without her support and motivation this was an impossible task for me.
Extract installed packages and version : Article Link.
Notebook Link Extract installed packages and version : Notebook Link
YouTube : Link
Deployed Application: Link
If you have any query feel free to contact me with any of the -below mentioned options:
Website: www.rstiwari.com
Medium: https://tiwari11-rst.medium.com
Google Form: https://forms.gle/mhDYQKQJKtAKP78V7