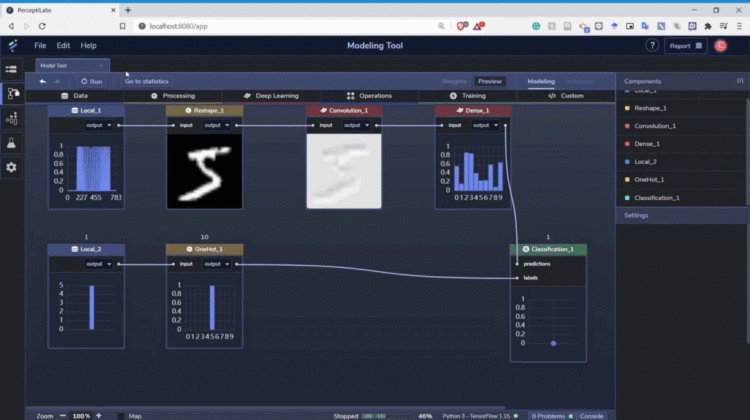
If you decide to follow my steps, let me breakdown the steps in simple ways. First, let’s select our training data by clicking the Data tab. On that tab, choose the Local selection to acquire the data from the local environment.
With the local component showing up, you could load the data by choosing the ‘Load Data’ button in the setting section on your right. In this selection, you could choose where your data came from, mostly from your local computer but for this practice, let’s choose the ‘classification_mnist_input.npy’ from the tutorial folder.
Next, let’s Reshape the data into more acceptable data for machine learning processing. We could do this by selecting the Processing tab and choose Reshape.
There are currently only four different processing options, but it is enough for a simple model building. Next, you want to drag the white line next to the Local output into the Reshape input. This is what we did to make sure the training data from our local source are Reshaped.
From here, we are ready to take the data into the Deep Learning process. To do this, we select the Deep Learning tab and choose the Convolution selection.
If there is anything that you want to change regarding the layer parameter, you could do that in the setting. Just adjust it with your necessity.
In the next step, I would add the Dense layer from the Deep Learning tab. With this, our model architecture would look like the image below.
This is our simple image classifier with Convolutional and Dense layer. To complete the machine learning process, we need to train it with the labels.
Let’s add another Local component and load the ‘classification_mnist_label.npy’.
For the next processing, let’s One Hot Encode our Label data using the OneHot from the Processing tab.
Lastly, we would build an image classifier; we would choose the Classification from the Training Tab.
After we connect all the necessary components, we are done building our machine learning model architecture. The whole map should look like the image below.
We only need to click the Run button to start the whole learning process with all components present. If you still want to explore all the possibilities by tweaking the setting or add more components, please do so.
I really like the Perceptilabs process as it is a simple but insightful process as we build our model. It might slightly lose the whole modeling process’s flexibility, but we offered an easier platform to track our model in exchange. Moreover, there is a debugging process where we can process the error swiftly.
If you are curious about the coding, you could view the whole modeling code by clicking the Notebook button.
If you only care about the single component code, you could select the section’s component in the setting section click the Open Code button.
If you have finished tweaking all the settings, we could start running the modeling process by clicking the run button.
