We will be installing the simulator using a docker image as it provides an easier and faster setup process. Note that this is intended for users who don’t care about the internals of Carla and just wish to run it stress-free. If on the other hand you wish to do a full linux build please see the official docs.
- Setup repository + Docker engine installation
The installation of Docker is pretty straightforward and awesomely explained in the official homepage.
$ sudo apt-get update$ sudo apt-get install
$ curl -fsSL https://download.docker.com/linux/ubuntu/gpg | sudo apt-key add -$ sudo apt-key fingerprint 0EBFCD88$ sudo add-apt-repository
apt-transport-https
ca-certificates
curl
gnupg-agent
software-properties-common
"deb [arch=amd64] https://download.docker.com/linux/ubuntu
$(lsb_release -cs)
stable"$ sudo apt-get update$ sudo apt-get install docker-ce docker-ce-cli containerd.io// NOTE REQUIRED: the following command is used to test if your installation was successfully.$ sudo docker run hello-world
2. Configure docker to be run without “sudo”.
By default, docker can be only run with root privileges. From the docs:
The Docker daemon binds to a Unix socket instead of a TCP port. By default that Unix socket is owned by the user
rootand other users can only access it usingsudo. The Docker daemon always runs as therootuser.If you don’t want to preface the
dockercommand withsudo, create a Unix group calleddockerand add users to it. When the Docker daemon starts, it creates a Unix socket accessible by members of thedockergroup.
The following commands are necessary for you to be able to run docker as a non-root user.
$ sudo groupadd docker$ sudo usermod -aG docker $USER$ newgrp docker
After running the above commands you will be able to successfully run docker as a non-root user:
$ docker --versionDocker version 20.10.3, build 48d30b5
The next step on the list is the installation of NVIDIA-docker which allows users to build and run GPU accelerated containers such as carla. To install it please run the following commands.
$ distribution=$(. /etc/os-release;echo $ID$VERSION_ID)
&& curl -s -L https://nvidia.github.io/nvidia-docker/gpgkey | sudo apt-key add -
&& curl -s -L https://nvidia.github.io/nvidia-docker/$distribution/nvidia-docker.list | sudo tee /etc/apt/sources.list.d/nvidia-docker.list$ sudo apt-get update$ sudo apt-get install -y nvidia-docker2$ sudo systemctl restart docker
After you have installed nvidia-docker2, let’s make sure that it is successfully set up by running a base CUDA container:
$ sudo docker run --rm --gpus all nvidia/cuda:11.0-base nvidia-smi
+-----------------------------------------------------------------------------+
| NVIDIA-SMI 460.32.03    Driver Version: 460.32.03    CUDA Version: 11.2     |
|-------------------------------+----------------------+----------------------+
| GPU  Name        Persistence-M| Bus-Id        Disp.A | Volatile Uncorr. ECC |
| Fan  Temp  Perf  Pwr:Usage/Cap|         Memory-Usage | GPU-Util  Compute M. |
|                               |                      |               MIG M. |
|===============================+======================+======================|
|   0  GeForce RTX 2060    Off  | 00000000:08:00.0  On |                  N/A |
|  0%   44C    P8    19W / 170W |    493MiB /  5931MiB |      6%      Default |
|                               |                      |                  N/A |
+-------------------------------+----------------------+----------------------++-----------------------------------------------------------------------------+
| Processes:                                                                  |
|  GPU   GI   CI        PID   Type   Process name                  GPU Memory |
|        ID   ID                                                   Usage      |
|=============================================================================|
+-----------------------------------------------------------------------------+
If you have received a similar output then the installation was successful and you are now able to run GPU-accelarated docker containers.
Now that we have installed the required requirements to successfully run a Carla docker container we are ready to install the simulator.
In this case we will install version 0.9.9 of Carla. If you want to install a different version you just need to change the version number to the one you want. Note however that a different version might cause compatibility issues with Carla-ROS-Bridge and consequently cause malfunctioning of the latter. Here you can access the list of all available Carla docker images.
- Pull Carla docker image
$ docker pull carlasim/carla:0.9.9# Verify that image was successfully installed$ docker imagesREPOSITORY       TAG         IMAGE ID       CREATED         SIZE
nvidia/cuda      11.0-base   2ec708416bb8   6 months ago    122MB
carlasim/carla   0.9.9       13f7e2eebaf1   10 months ago   7.94GB
hello-world      latest      bf756fb1ae65   13 months ago   13.3kB
Now that Carla’s image is successfully installed we need to start the Carla server so that we can later copy Carla’s python client in order to be able to run the simulator.
2. Run the simulation server
Now it is time to start a detached container running the simulation server.
$ sudo docker run -d -p 2000-2002:2000-2002 --runtime=nvidia -e NVIDIA_VISIBLE_DEVICES=0 carlasim/carla:0.9.9 /bin/bash CarlaUE4.sh
3. Copy Python client to folder
In order to run the python clients available we will have to copy the contents of the PythonAPI folder to our own directory space in order to successfully run them. To do so, lets copy its contents using “docker cp” command.
$ cd ~/Documents# Note that pedantic_cray is the name of the container. Use can use the container ID instead. To know your container ID/name run 'docker ps -a'.$ sudo docker cp pedantic_cray:/home/carla/PythonAPI ./
4. Install the required dependencies for running the Python client
Note that we will use python2 instead because of Carla-ROS-Bridge compatibility. If you don’t care about running Carla-ROS-Bridge you may install python3 instead.
$ sudo apt install python
Install “pip” and the required dependencies:
$ sudo apt install python-pip$ pip install setuptools pygame numpy
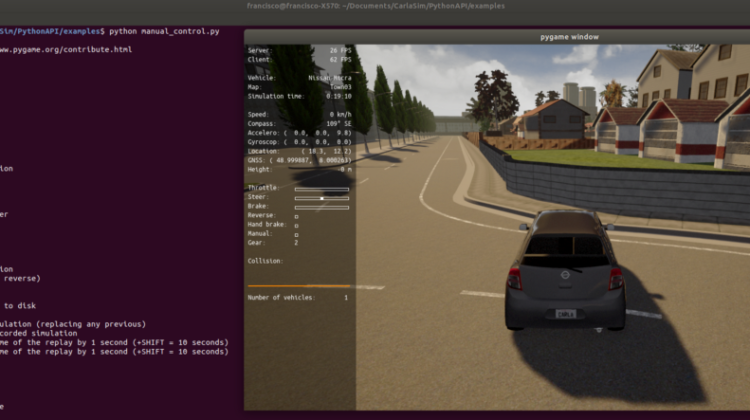
5. Run simulation client
Afterwards we are able to run the simulator. To do so:
$ cd ~/Documents/CarlaSim/PythonAPI/examples$ python manual_control.py
If everything went well you should be able to see a new Pygame window with the ongoing simulation similar to the one below:
Note that if you get any missing package error just make sure to install it with pip.