In this article, a simple implementation of video augmentation is explained, to increase the number of videos for machine learning training tasks.
In machine learning, a lot of times we have to deal with data that is insufficient to train the model to work properly. For image processing based tasks, we remedy this by augmenting our data with different techniques such as rotation, noise addition, cropping, altering brightness etc. so that our model can generalize well to all kinds of input data and be able to take the right decisions.
For image based tasks, we can use any number of augmentation methods. Keras library provides ImageDataGenerator function, then Pytorch has some functions and there is one library called “imgaug” that allows augmentation with different specifications too. For this task, I used “imgaug” to augment videos.
To augment video, the process is mostly same as image augmentation because a video is actually a collection of pictures (frames) ran fast on screen at a speed referred to as Frames Per Seconds (FPS), thus making it a video.
Simply put, we will fetch each frame of input videos and augment them just as we augment an image and store all such images in a temporary folder. We then pack those images to create the augmented video.
The libraries that come in handy for video augmentation are as follows:
- Opencv — To get input video FPS (Can be installed using pip install opencv-python)
- imgaug — for Image augmentation (Can be installed using pip install imgaug)
- imageio — for video reading and image writing (Can be installed using pip install imageio)
- imageio-ffmpeg — for creating video from images (Can be installed using pip install imageio-ffmpeg)
Rest are basic libraries os, shutil (for creating/removing folders), random (for generating random numbers) and argparse (to fetch command line arguments).
The code for video augmentation can be accessed on Github at:
https://github.com/shayanalibhatti/Video-Augmentation-Code
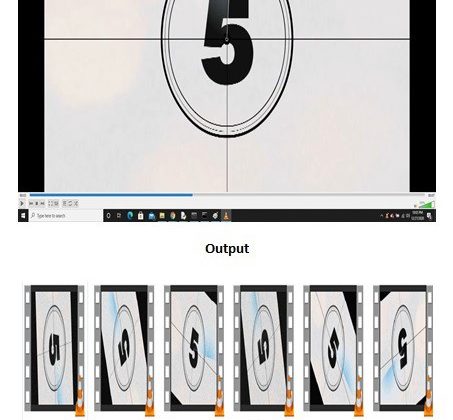
For augmentation of videos, I have used a random number generator to rotate output video at an angle, and did same for noise to be added to video. Here is the result of the code, (unfortunately) a rotated and noise added snap of each clip, as video cannot be uploaded here. It is just to show how the augmentation works. Feel free to try on your own clips to see augmented videos. Following video used for input is by Nicolas Boulard from Pixabay (https://pixabay.com/videos/countdown-10-seconds-film-2637/)
Input video snapshot:
Output videos snapshot:
Following image shows the rotated and noise added, augmented .mp4 video clips. Try the code to see the results.
Hopefully this article and link to code can be used to make it easier for machine learning enthusiasts to augment their videos to come up with robust models to solve real-world problems. Feel free to experiment with the code and tweak it to your liking. And if the code helps, give a clap 🙂